Author Archives: food4so

Tteokbokki: Spicy Korean Rice Cakes

Seollal, or the Lunar Korean New Year, is a very important holiday to Koreans. The celebration typically lasts for three days, with traditional games being played with family and young children bowing to their parents, grandparents and other elders, receiving “good luck” money as a reward. There is also a lot of eating, and one traditional food served this time of the year is Tteokguk: Korean Rice Cake Soup. As my mother explained it to me, since the rice cake is sticky, good luck is supposed to stick to you. She makes it every year and I usually have a bowl, but I am actually more of a Tteokbokki fan: Spicy Korean Rice Cakes. I decided I would make this dish as a part of my Lunar New Year celebration.

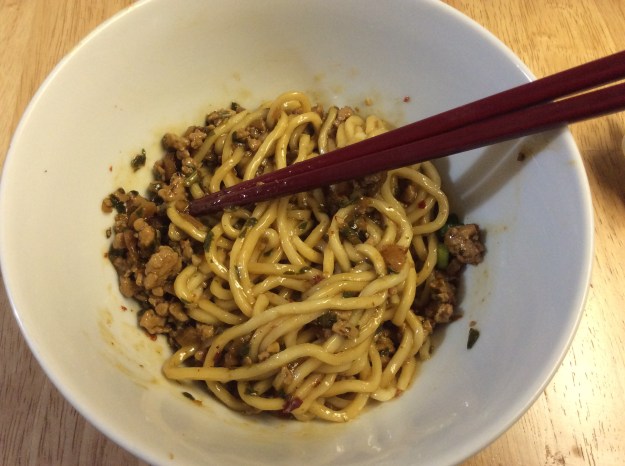
Tteokbokki is more of a Korean street food or snack, but the dish has become so popular, it’s being served at many restaurants and food courts all over Koreatown LA. Traditionally it is made with tubular Korean rice cakes (which look similar to string cheese), gochujang (spicy fermented, Korean bean paste), and fish cakes. Sometimes you can find hard-boiled eggs and ramen noodles in this dish, and my mom always added flank steak to her Tteokbokki. I took her version of the dish and elevated it by using fresh rice cakes, braised short ribs, and caramelized onions, while keeping the traditional flavors intact. When I tested this dish on a non-Korean friend, she called it a “spicy Korean gnocchi.” Though the texture of tteokbokki is definitely different than gnocchi, it’s an interesting comparison nonetheless.

Note that here is some oven time involved in making this dish, so make sure you read the entire recipe before starting. If you prefer, you can make the braised short ribs a day in advance. Enjoy!

Tteokbokki: Spicy Korean Rice Cakes with Braised Short Ribs

Serving Size: 4

Braised Short Ribs

12 ounces of bone-in short ribs (about 3 slices)*
1 tablespoon of sunflower oil or any neutral oil
Kosher salt
Freshly cracked pepper
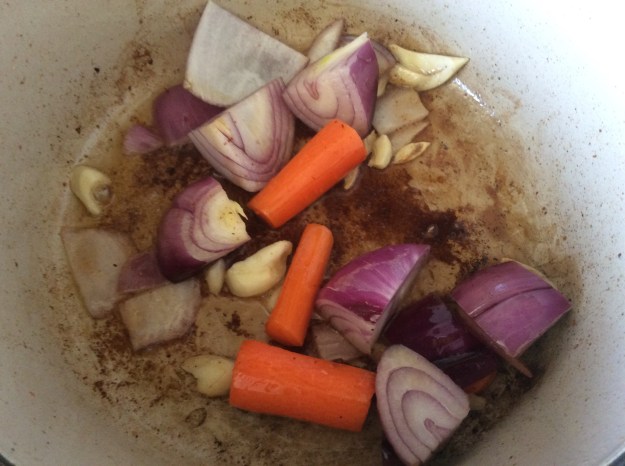
1 carrot (roughly chopped)
1/2 red onion (roughly chopped)
2 garlic cloves crushed
1/3 cup of sake*
2 tablespoons of mirin*
3 tablespoons of organic soy sauce
1 1/2 cups of water
2 teaspoons of sugar
1/2 teaspoon of freshly cracked pepper

Preheat oven to 325°

1. Sprinkle the short ribs with salt and pepper.

image

2. Heat an enamel-coated cast iron pot or a Dutch oven to medium high heat. Add the oil. Sear the short ribs for about 2 minutes on each side. Cook them in 2 batches. Set aside.

image

3. In the same pot, add all the vegetables and sauté for 5 minutes.

image

4. Add the sake and mirin and deglaze the fond remaining from the short ribs, scraping the bottom of the pot. Reduce by half (about 2-3 minutes).

image


5. Add the soy sauce, water, sugar and pepper. Bring to a boil. Immediately skim off the excess fat layer and impurities. Turn off the heat.

image

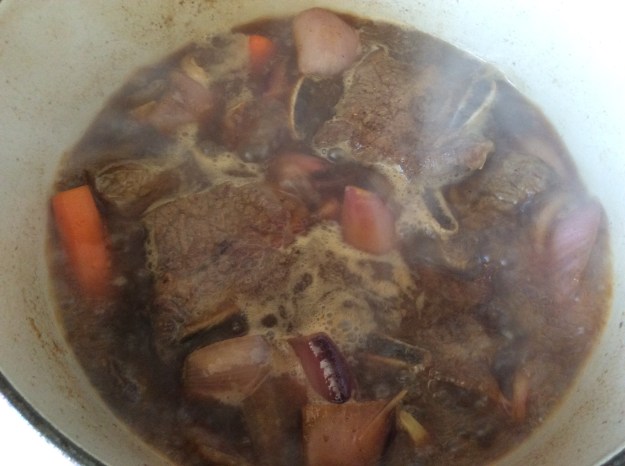
6. Cover with a lid and transfer the pot to the oven. Braise for about 1 1/2 hours.

7. Remove from oven. Take the meat out and set aside, and then strain the broth and discard the solids. Set the broth aside.

image

image

8. Remove the bones. Cut the meat into small pieces, picking out the gristle. Set aside.
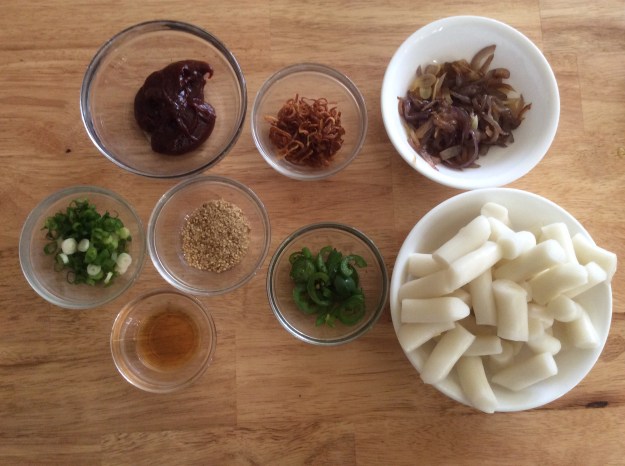
image
Tteokbokki

2 tablespoons of sunflower oil or any neutral oil (divided in half)
1/2 red onion (thinly sliced)
2 garlic cloves (thinly sliced)
Pinch of salt
1 jalapeño (sliced 1/4″ thick)
Broth from the braised short ribs
2/3 cup of water
2 tablespoons of Gochujang: Korean red bean paste*
1 teaspoon of sugar
2 teaspoon of sesame oil
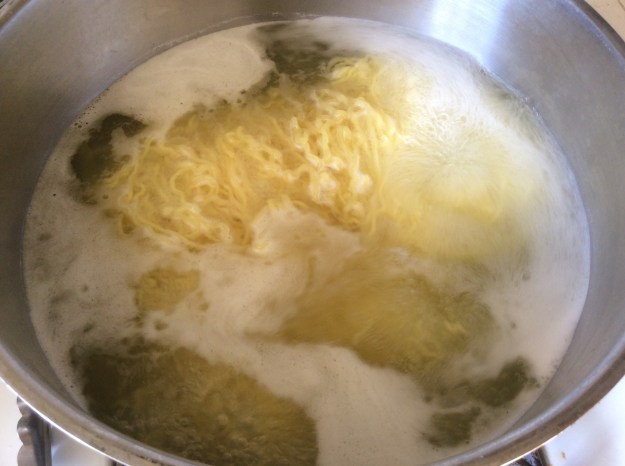
1 pound of fresh Korean rice cake, cut in half*
2 green onion, thinly sliced
1 tablespoon of toasted sesame seeds, crushed*
Korean pepper flakes*
2 tablespoons of fried shallots, optional

1. While the short ribs are in the oven braising, heat a medium sauté pan to high and add 1 tablespoon of oil. Add the red onions and a pinch of salt and sauté for 2 minutes.

image

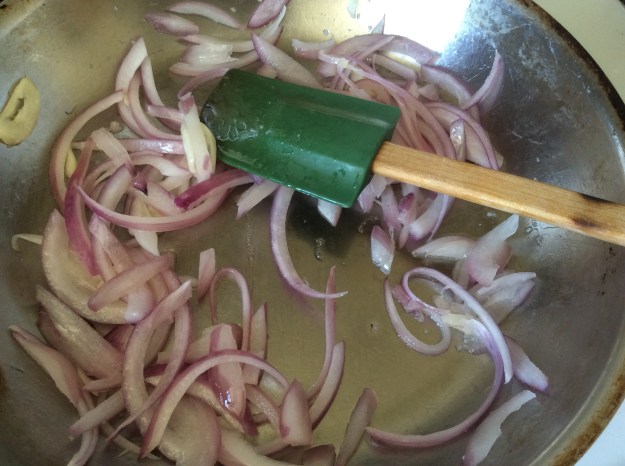
2. Add the garlic, and reduce the heat to low. Cook for 20-25 minutes, stirring every a couple of minutes. Remove from pan. Set aside.

3. Clean the bottom of the same pan with a paper towel, removing any excess onion bits. Heat it to high and add the remaining tablespoon of oil.

4. Add the jalapeño slices. Sauté for 1 minute and remove from heat. Set aside for garnish.

image

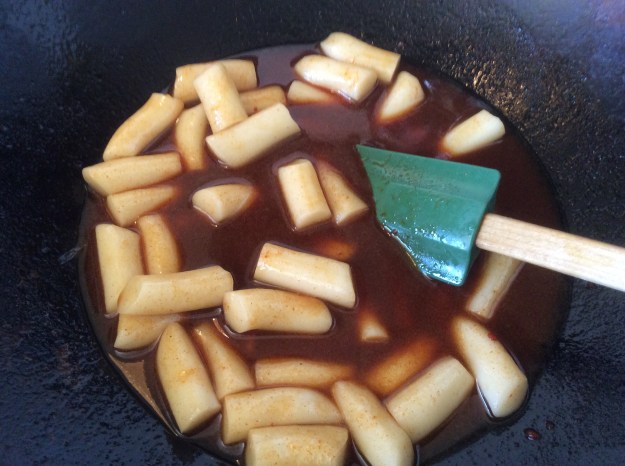
5. Place the broth from the braised short ribs, 2/3 of water, and 2 tablespoons of Korean red bean paste in large wok or sauté pan. Bring to a boil.

image

6. Add the fresh rice cakes and bring back to a boil and cook for one minute.

image

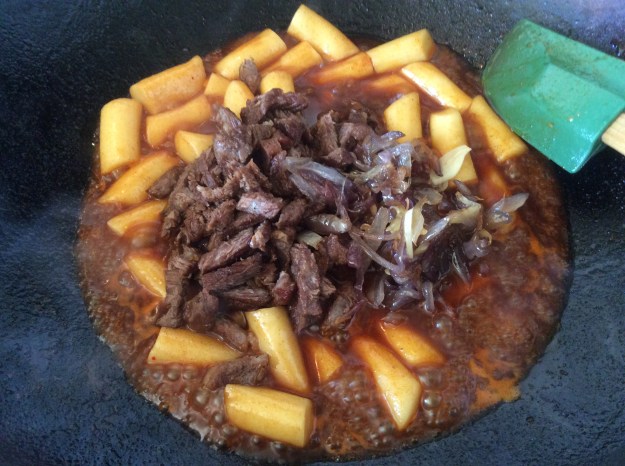
7. Add the caramelized onion mixture, the braised short ribs, sesame oil, and sugar. Reduce heat to medium. Cook until the sauce thickens and the rice cakes are soft and chewy (about 3-5 minutes).

image

image

8. To serve, divide the Tteokbokki into 4 bowls. Sprinkle with sliced green onions, fried jalapeño, sesame seeds, and fried shallots. Serve immediately.

image

*For the toasted sesame seeds, you can just add some sesame seeds to a dry pan. Toast over medium heat until golden brown. Transfer to a mortar and pound a few times with a pestle.

Mirin can be found in most Japanese Markets. You may omit the mirin and add one more teaspoon of sugar to the recipe. The rest of the ingredients can be found at any Korean Market. My favorite brands for the gochujang are Haitai or Wang.

Spicy Minced Chicken Noodles


I live in the San Gabriel Valley, the Asian food Mecca of Southern California. San Gabriel Valley is home to some of the best Chinese food outside of China. There is wide array of regional cuisines like Sichuan, Cantonese, Hunanese, etc. In addition to Chinese food, you can find Taiwanese, Vietnamese, Burmese, and even food from Borneo. From soupy dumplings to Hainan chicken, one will never run out of food options. One of my favorite noodle dishes out here is the minced pork noodle, made with a fermented bean sauce. Every restaurant has their own version, but it is always made with ground pork. I created my own version with organic ground chicken and spiced it up a bit. I use a chili pepper sauce made in San Francisco and noodles made nearby in Commerce (where I’ve actually visited the factory).

I tested this noodle dish at my office and it was a hit, even among those that don’t like spicy food. I may not be Chinese, but I have become very familiar with Chinese flavors, and based on the response I got, these noodles are as good as any noodle dish in the San Gabriel Valley. Once you have all the ingredients ready, the dish takes less than 20 minutes to whip up, but be sure to read the whole recipe in advance, as almost every step is 3 minutes or less and you’ll be moving quick! But don’t let that scare you off – once you make this dish, I guarantee you’ll enjoy it!

Serving Size: 2 large bowls of noodles

Ingredients

2 tablespoons of oil
3 cloves of garlic (minced)
8 ounces of organic ground chicken
1/2 cup of finely chopped choy sum leaves* or spinach leaves.
2 tablespoons of finely chopped preserved turnips*
2 tablespoons of chili pepper sauce*
2 tablespoons of organic soy sauce
1 tablespoon of Chinese black vinegar or balsamic vinegar
1/4 teaspoon of Chinese five spice
1 teaspoon of sugar
3/4 cup of homemade chicken stock or store-bought low-sodium chicken broth (cold)
2 teaspoons of organic cornstarch
12 ounces of fresh Chinese wheat noodles (medium thickness)*
1 green onion, thinly sliced
Fresh cilantro leaves
Chinese chili oil (optional)

image

Directions

1. Bring a large pot of water to boil.

2. Meanwhile, heat a wok or a large sauté pan on high heat. Add 2 tablespoons of oil.

3. Add the minced garlic. Sauté for 15 seconds.

image

4. Add the ground chicken. Sauté for 3 minutes, breaking up the meat.

image

5. Add the choy sum. Sauté for 1 minute.

image

6. Add the preserved turnips. Sauté for 30 seconds.

image

7. Add the chili pepper sauce, soy sauce, vinegar, five spice, and sugar. Sauté for 1 minute.

image

8. Add cornstarch in the chicken stock, making sure your chicken stock is cold. Mix well and and pour directly into the wok, stirring the meat. Cook until the sauce boils and thickens. This should take about 3-5 minutes. Turn off the heat.

image

image

9. Take the fresh Chinese noodles and put in the boiling water. Follow the cooking directions on the package. The brand I use takes 2.5 minutes.

image

10. Drain the noodles but don’t rinse. Divide the noodle into bowls.

image

11. Pour a generous amount of meat sauce over the noodles. If using, drizzle a tablespoon of chili oil over the sauce. Garnish with chopped green onion and cilantro.

image

12. Serve immediately.

image

*Here are photos of some hard to find ingredients I used in this recipe. Also, I added a picture of the choy sum before it was chopped up. You can find all these ingredients at a Chinese grocery store:


Meyer Lemon Bars

When I go to a bakery or cafe, I usually don’t select lemon bars for my sweet treat. I find most lemon bars too tart and sweet. Also, the traditional shortbread crust a little too tough. Now Meyer lemon bars on the other hand, are delicious, slightly tart with a hint of sweetness. Meyer lemons are naturally sweeter than regular lemons because they are a hybrid of lemons and mandarin oranges, requiring less sugar when when making Meyer lemon bars. Meyer lemons are also brighter yellow in color and have a thinner skin, giving the bars a neon-like color.

My Meyer lemon bar recipe has half the sugar of other lemon bar recipe. Some recipes put in the zest directly in the curd. I liked the added flavor from the zest, but then curd didn’t have the smooth texture. By infusing the lemon zest in the lemon juice, and then discarding the zest did the trick. I also add cornstarch to the crust to make it more crumbly. That way it didn’t feel like I was biting into a hard cookie. When Meyer lemon season comes along, I bake a couple of batches: one for my family and one for my sister-in-law. My sister-in-law doesn’t like anything with lemon flavor, but loves these lemon bars. I think that’s a good indication that this recipe is pretty good. Happy baking.

Baking Spray
1 1/4 cups of Meyer lemon juice (about 5-6 Meyer lemons)
1 Tablespoon of Meyer lemon zest
1 1/2 sticks of unsalted butter (12 Tablespoons) – soften
1/2 cup of sugar
1 teaspoon vanilla extract
1 1/2 cups of all-purpose flour
1 Tablespoon of organic cornstarch
1/4 teaspoon of Kosher salt
1 1/2 cups of sugar
6 large eggs
1/2 cup of all-purpose flour
1 1/2 teaspoon of baking powder
1/8 teaspoon of Kosher salt
Powder sugar for dusting

image

1. Coat the bottom and sides of a 13″x 9″ baking pan with not a nonstick baking spray. Set aside.

2. Add the lemon zest to the lemon juice. Set aside.

image

3. Heat the oven to 350°.

4. In a stand mixer, add the butter and 1/2 cup sugar and beat on medium speed until creamy (about 3 minutes).

image

5. Add the vanilla extract and beat for 30 more seconds.

image

6. In a small bowl, whisk the 1 1/2 of flour, cornstarch, and the 1/4 teaspoon of salt. Set the mixer to the lowest setting and slowly add the flour mixture half a cup at a time.

image

7. The mixture will come together and look like small peas. Turn off the mixer.

image

8. Using your clean hands, form a ball. Then flatten it and place it directly in the greased baking pan, pressing down until the bottom of the pan is evenly covered with the dough.

image


9. Using the tines of fork, prick the dough and several places. The will prevent the dough from rising and forming pockets.

image

10. Place the baking pan in the freezer for 10 minutes.

11. Remove the baking pan from the freezer and put it directly in the oven. Bake for roughly 30-35 minutes until slightly golden.

image

12. Place on a rack to cool.

13. Turn up the oven heat to 350°.

14. In a large mixing bowl, whisk the 1/2 cup of flour, baking powder, and 1/8 teaspoon of salt.

image

15. Add all the eggs into the flour mixture. And whisk until the mixture is smoot, but don’t over whisk.

image

16. Add the 1 1/2 cups of sugar and whisk again until smooth.

image

17. Place a sieve over a bowl, and pour the Meyer lemon juice and zest mixture into the sieve. Discard the Meyer lemon zest.

image

18. Add the Meyer lemon juice to the egg, flour, sugar mixture. Whisk just until the juice is incorporated.

image

19. Pour the Meyer lemon curd mixture over the baked crust.image20. Place in the oven and bake for 30-35 minutes or until the center is set and edges are golden

21. Cool on a rack for about 30 minutes.

image

22. Cut into 24 squares. Place the squares on top of a cooling rack. Place a parchment paper underneath the rack.

image

23. Dust Meyer lemon bars generously with the powder sugar. Dust only the ones you will be serving the day of and refrigerate the rest for up to three days. Dust remaining with powder sugar right before serving. This prevents the lemon curd from absorbing the powder sugar during refrigerating.

image

Blackberry Meyer Lemon Scones

I have always been a fan of English Afternoon Tea, not to be confused with English High Tea, which is hearty meat and potatoes tea. During afternoon tea social events, you would find a nice pot of tea, finger sandwiches and, of course, scones. Most of the scones served at afternoon teas were dry and the only way to make to them go down was to spread plenty of jam and clotted cream on them and chase them with some tea. I thought to myself, “There has to be way to make tender scones.” Then I was asked to host a tea party for a bridal shower. It was the perfect opportunity to work on my scone recipes.

I tested several scone recipes and one from Cook’s Illustrated had an interesting technique. Their trick to making the scones tender is using grated, frozen butter in the dough instead of cutting squares of cold butter into the flour mixture. Not only was it a great short cut, but it made the scones perfectly tender. It was pure genius. I took that recipe and a tweaked it a bit and then added blackberries and Meyer lemons. What better time to share this recipe than during Meyer lemon season! The scones are jammy and buttery with a crispy exterior. You won’t need extra butter, jam or clotted cream with these scones. Just serve them with tea or coffee. Enjoy!

Blackberry Meyer Lemon Scones

Yield: 12 scones

2 sticks of frozen unsalted butter (you will only use 4 ounces grated).
1 cup of fresh blackberries (or your favorite berries) – Freeze for at least 2 hours
2 tablespoons of sugar
1 3/4 cups of Sonora wheat flour or unbleached all-Purpose flour
1/4 cup of spelt flour
1/2 cup of sugar
2 teaspoons of baking powder
1/2 teaspoon of salt
1/2 teaspoon of baking soda
1 teaspoon of freshly grated Meyer lemon zest
1/2 cup of whole milk
1/2 cup of sour cream
1 tablespoon of Meyer lemon juice
3 tablespoons of heavy cream
Crystal sugar (for sprinkling)

1. Line one large baking sheet with parchment paper. Set aside.

2. Take the frozen sticks of butter out of the freezer. Using a box grater, grate on the largest holes. Grate about half of each stick. Place the grated butter back into the freezer. Save remaining ungrated butter for another use.

image

3. Take the frozen blackberries out of the freezer. Using a serrated knife, cut them in half. Put them in a small bowl and toss them with the two tablespoons of sugar. This will make the blackberries jammy when you bake the scones. Set aside.

image

image

4. Whisk the milk and sour cream in a small bowl. Set aside.

image

5. In a large bowl, add the flour, 1/2 cup of sugar, baking powder, baking soda and salt. Whisk to combine. Take the frozen grated butter and toss into the dry ingredients until the butter is evenly distributed and no clumps are present. Do this quickly and don’t handle the butter too much.

image

image.jpg

6. Stir the Meyer lemon juice into the milk and sour cream mixture and pour into the flour butter mixture. Using a rubber spatula, fold until the mixture comes together.

image

7. Generously flour your work surface.

8. Take the dough and knead quickly a few times, just until the dough can be rolled. It is important that you don’t overwork the dough or the scones will become tough.

image

9. Roll out to a 12” x 12” square and then fold in thirds and the fold in thirds again. This process will help create layers.

image

10. Place on parchment-lined plate or tray and place in the freezer for 5-10 minutes or until it gets cold.

11. Heat oven to 425°.

12. Remove the dough and again roll out to a 12” x 12” square. Take the berries and distribute them evenly throughout the dough, pressing them in. Then roll the dough tightly, securing the berries inside like in a jelly roll and then flatten.

image

image

image

13. Using a serrated knife (cleaning the knife with a paper towel in between cuts), cut the the long rectangle in half, then each rectangle in thirds. You should have 6 smaller rectangles. Cut each small rectangle on a diagonal to form 2 triangles.

image

14. Place the scones on the parchment-lined baking sheet. Brush with cream and sprinkle with crystal sugar.

image

15. Place the baking sheet with the scones in the the freezer for about 5 minutes.

16. Remove the scones from the freezer and place in the oven on the center rack. Bake for about 10-12 minutes, then turn the broiler on high and broil for 1-2 minutes until the top is golden brown. Cool on a rack for 10 minutes.

image

17. They are best the day of, but you can keep them in an airtight container for up to three days.

Walnut Pesto Rice Bowl

Now that the New Year is here, one of resolutions on many people’s lists is to eat healthier. Here is a vegetarian brunch dish that is easy to assemble. The inspiration behind this dish comes from the sorrel pesto rice bowl from Sqirl Cafe and Bakery in Los Angeles. Their unique and delicious rice bowl is made with organic brown rice, sorrel pesto, picked radishes, preserved Meyer lemons, sheep’s feta, hot sauce and a poached egg. This dish is so popular that people will wait in line for well over an hour to order it and, on the weekends, it is almost impossible find an open table at the restaurant. To avoid the long wait in the lines, I decided to create my own version.

My pesto bowl is made with a walnut pesto recipe. I prefer walnuts over pine nuts because they have a better flavor and nutritional value. I also added lemon zest and lemon juice to mimic the sorrel flavor for this recipe. I’m not big fan of feta so I used goat cheese in mine, but you can use feta instead if you prefer. This recipe only make two bowls, but you can always double the recipe if you want to feed a family. Here is to healthy start for the New Year! Enjoy!

Walnut Pesto Bowl

Serving Size: 2

3 tablespoons of chopped yellow bell pepper, small dice
3 teaspoons of white vinegar, divided
2 small red radishes, thinly sliced
2 teaspoons of freshly squeezed lemon juice
Kosher salt
2 farm fresh eggs
1/4 cup of walnut pesto, plus extra for serving (recipe below)
2 1/2 cups of cooked organic brown rice (short grain)
1 ounce of goat cheese, crumbled
2 basil leaves, julienned for plating
Jalapeño hot sauce for serving, optional
Sea salt
Freshly ground pepper

1. In a medium pot, bring 5 cups of water to boil. Add 1 teaspoon of white vinegar.

2. Meanwhile, in a small bowl, add the diced yellow bell pepper, 2 teaspoons of white vinegar, and a pinch of Kosher salt. Let it sit for 5 minutes. Remove as much of the liquid as possible, squeezing the liquid from the bell peppers. Set aside.

image

3. In another small bowl, add the thinly sliced red radishes, lemon juice and a pinch of Kosher salt. Let it sit for 5 minutes. Remove as much of the liquid as possible, squeezing the liquid from the radishes. Set aside.

image

4. Once the pot of water comes to a boil, reduce the heat to a simmer. Crack the eggs one at a time into the water. Make sure you leave enough space in between the two eggs so they don’t cook together. Poach for about 2 minutes or until the egg sets but the center is still soft and runny. Remove with a slotted spoon and place onto a paper towel lined plate. Set aside.

image

5. Add the cooked brown rice to a medium bowl, making sure it’s hot. (If not, heat in the microwave with a damp paper towel over it.) Add the walnut pesto and mix to combine.

image

6. Divide the pesto rice into two bowls. Garnish with the radishes, crumbled goat cheese, chopped quick pickled yellow peppers and top with the poached eggs. Sprinkle some chopped basil, sea salt and freshly grated black pepper. Add a little extra pesto or jalapeño sauce, if using. Serve immediately.

image

Walnut Pesto

1 1/2 cups of organic basil leaves
1/4 cup of toasted walnut, chopped
1 garlic clove (thinly sliced)
1/4 cup of Parmigiano-Reggiano
1 teaspoon of lemon zest
2 tablespoon of lemon juice
Salt
Freshly ground pepper
2/3 cup of extra-virgin olive oil
Red pepper flakes (optional)

image

1) In a blender or food processor, add the basil, walnuts, garlic, cheese, lemon zest, lemon juice, pinch of salt, pepper and a couple tablespoons of oil in a blender. Pulse a few times. You made need to use a rubber spatula to push down the basil leaves.

image

2) Keep the lid on but remove the plastic cap. Turn on the blender (or food processor) and slowly add the remainder of the oil in a slow stream. Blend until the pesto is smooth. Taste for seasoning and add more salt as needed.

image

3) Transfer to a bowl. Use immediately or refrigerate for up to one week.

image

Agnolotti dal Plin

In April of 2003, Los Angeles Times featured an article in their Food section about Il Ristorante di Guido da Costigliole, a restaurant in the Piedmont region of Italy. The article focused on a regional, filled pasta called agnolotti dal plin. Lidia Alciati, the owner and chef of the restaurant, cranked out thousands of agnolotti every week for 40 years. I was was intrigued and I saved the article for my honeymoon trip to Italy that June.

When my husband and I arrived in Asti, we learned that Lidia had retired and that her sons had taken over the family business and found their restaurant a new home. We were directed to a beautiful 5-star hotel in a restored 1619 monastery, atop a hill overlooking a picturesque valley of vineyards. The restaurant was located under the hotel in a converted wine cellar. Once we were seated at our table, I was overcome with excitement. When the agnolotti arrived, the little, yellow pillows of pasta were glistening in light butter sauce. When I took a bite, I thought I had died and gone to heaven. The delicious pasta packets were filled with rabbit, pork, veal, spinach, Parmesan cheese and hint of nutmeg.

Today I bring you my version of Guido’s agnolotti. Instead of adding rabbit and veal, I used all pork for my recipe, and I also replaced the spinach with Swiss chard. Make sure you roast the pork a day in advance. For the pasta, I really like Thomas Keller’s pasta recipe for the agnolotti. It’s easy to work with and the perfect texture for this dish. You can also make the pasta a day ahead if you prefer. Making this dish requires a lot time, but it’s worth the effort. This recipe makes enough to feed an army so it’s perfect for the holidays or any other special occasion. Enjoy!

Agnolotti dal Plin

Serving size: 12

Olive oil
1 garlic clove, finely chopped
2 teaspoons of finely chopped rosemary
2 pounds of roasted pork shoulder (recipe below)
3 cups of Swiss chard, chopped
1 cup freshly grated Parmigiano-Reggiano
1/2 teaspoon of nutmeg
Salt
Freshly grated pepper
2 large eggs
28 ounces of fresh pasta dough – Thomas Keller’s Pasta Recipe
1/2 cup of unsalted butter
1/2 cup of reduced pork or veal stock
6 sage leaves
Parmigiano-Reggiano for serving

 
1. Take the pasta out of the refrigerator and bring to room temperature.

2. While waiting for the pasta to come to room temperature, take the roasted pork out of the refrigerator and remove most of the fat using a knife. Cut into large chunks and then pulse a few times in the food processor until it resembles ground beef. Transfer to a large bowl.

3. Remove the reserved pork drippings from the refrigerator. Scrape off the fat cap and you should be left with a gelatinous pork stock. Set aside.

4. Heat a large sauté pan over medium heat. Add 1 tablespoon of olive oil and sauté the Swiss chard for about five minutes. Add a 1/4 cup of water and cover with a lid until most of the water is absorbed. Transfer to a food processor and process until smooth. You may need to add a little water. Set aside.

5. Heat the same sauté pan over medium-high heat. Add 1 tablespoon of olive oil and add the garlic and rosemary. Sauté for one minute. Add the ground pork meat and cook for about 5 minutes. Season with salt and pepper to taste. Transfer back to the large bowl and cool at room temperature.

image

6. Once the meat has cooled, stir in the Parmigiano, 2 eggs (slightly beaten), Swiss chard, reserved pork stock, nutmeg, and salt and pepper to taste. This is the agnolotti filling. Cover with plastic wrap, and place in the refrigerator while you roll out the pasta.

image

7. Roll out the pasta dough a few sheets at a time and keep any unused portion of pasta tightly wrapped in plastic. On your pasta roller, roll the pasta sheet to the second thinnest setting.

image

8. Remove the filling from the refrigerator. Using a small teaspoon, place a portion of filling about 1 inch from the bottom of the sheet. Continue placing portions of filling across the bottom of the sheet, leaving 1 inch space in between each.

image
9. Fold the bottom of the pasta sheet to partially cover the filling.

image
10. Fold from the bottom again, rolling the pasta while pinching between each pocket of filling. It is important to leave this “pinched” area between the agnolotti, or when the agnolotti are separated, they may come unsealed.

image
11. Run a crimped pastry wheel away from you and between the center of each pinched area to create the individual agnolotti. Place the filled agnolotti on a parchment-lined baking sheet. Place the baking sheet with the agnolotti inside the freezer until frozen.

image
12. Repeat the process until all the agnolotti is filled.

image.jpg

13. Fill a large pot of water halfway and add a generous amount of Kosher salt. Bring to a boil.
14. Meanwhile, in a large sauté pan over medium heat, add half the butter until melted. Add three sage leaves, sauté for one minute. Add 1/4 cup of the reduced pork or veal stock. Lower the heat to warm.
15. Once the water is boiling, add about 1/4 of the agnolotti. Once the pasta rises to the top cook for about one more minute. With a large slotted spoon, transfer to the sauté pan with butter sauce.

16. Bring the water back to a boil and add another 1/4 of the agnolotti. Once cooked, transfer to the same pan. Toss to coat. Transfer to a large serving platter.  Repeat the process with the remaining agnolotti or you can also freeze the rest in a plastic bag for up to 1 month.

17. To serve, place about 8 to 10 pieces of agnolotti on a plate. Grate a generous amount of Parmesan cheese, a couple turns of a pepper mill, and sprinkle with a little sea salt. Served with a nice glass an Italian red wine.

image.jpg


Roasted Pork Shoulder

1/2 teaspoon of paprika
1/2 teaspoon of brown sugar
1/4 teaspoon cumin
1/4 teaspoon chili powder
1 teaspoon of salt
1/2 teaspoon of pepper
2 1/2 lbs. of pork shoulder
Leaves from 1 sprig of rosemary
2 cloves of garlic, smashed
1 onion, roughly chopped
2 carrots, roughly chopped
2 celery ribs, roughly chopped
1 bay leaf

1. Mix the first 6 ingredients in a small bowl and rub all over the pork. Then rub the pork with the smashed garlic and rosemary leaves. Let the pork rest for 30 minutes at room temperature.

image

2. Heat oven to 450°.

3. In a small roasting pan, add the pork. Scatter the onions, carrots, celery, and the bay leaves in the pan. Roast for 30 minutes.

image

4. After 30 minutes, turn the heat down to 325°. Remove the pork out of the oven and cover tightly with aluminum foil. Put the pork back in the oven and roast for about 1 hour and 15 minutes.

5. Cool to room temperature. Transfer the meat drippings into a container with a lid. Cover the pork with foil. Place both the pork and the drippings in the refrigerator until ready to use

Malted Chocolate Truffles with Sea Salt

The confections known as chocolate truffles are a delicious treat which you can find at most candy shops. The reason these confections are called truffles is, once the small round balls are coated with traditional cocoa powder, they resemble the fungus. Although they seem really fancy, they’re relatively easy to make at home. All you need is some good quality chocolate and heavy cream to make a ganache center. You can add different ingredients, like spices, liquors or extracts to vary the flavor.

Many years ago, I used to frequent a confection shop in Los Angeles where the pastry chef made amazing truffles. One of my favorites was the malted milk chocolate truffle. They were creamy and smooth with just enough malt to perfectly complement the cocoa flavor. Here is my version of the truffles using dark chocolate and Fleur de Sel, which make great gifts for the holidays. Enjoy!

Malted Chocolate Truffles with Sea Salt

Yield: about 3 dozen

1 lb. of dark chocolate (52-54% cacao)
3/4 cup of heavy cream
2/3 cup of barley malt syrup*
1/2 scant teaspoon of sea salt (Fleur de Sel)
1/2 cup of finely chopped roasted hazelnuts or almonds
Pinch of Kosher salt
1/2 cup of cocoa powder (preferably Valrhona)

1. Chop the chocolate into 1/4″ pieces and place in a large glass bowl. Set aside.

image

2. Add the cream, milk, and malt syrup in a small sauce pan. Place the pan on the burner over medium-high heat. Once the mixture comes to a boil, immediately remove from the heat and pour the liquid over the chopped chocolate. Let the mixture sit for 5 minutes.

image

3. After five minutes, take a rubber spatula and slowly stir the chocolate and cream mixture (ganache). Once the ganache just comes together, add the Fleur de Sel. Stir just until the salt is incorporated. Cover the bowl with plastic wrap and place it in the refrigerator to cool for at least one hour.

image.jpg

image

4. To prepare your truffle station, place the chopped hazelnuts in a small bowl. Add a pinch of Kosher salt and stir. Set aside.

5. Add the cocoa powder in a bowl. Set aside. Line a baking sheet with parchment paper. Set aside.

image

6. Remove the ganache from the refrigerator. Using a truffle scoop (.5 ounce scoop), scoop the ganache and roll into a smooth ball. Place on the parchment lined baking sheet. Repeat the process until you have enough to star the coating process. (If the balls soften, place the baking sheet in the freezer for five minutes once done.)

image

image

7. Roll 1/2 of the ganache balls in the cocoa powder and the other 1/2 in the chopped hazelnuts. Make sure you coat one ball at a time.

image

8. Place each truffle in a mini baking cup. Arrange them then in a confection box. Refrigerate until ready to gift.

image
*Sold at most gourmet health food stores.

Korean Dumplings

My mom may not have been the best cook in our neighborhood when I was growing up, but she had a few good recipes up her sleeve. One of those recipes is for her mandu, which are Korean dumplings. Every Korean mom on our block had her own special mandu recipe – one mom added sweet potato noodles to her dumplings, while another added bean sprouts – but I always liked my mom’s dumplings the best because they were simple but delicious. It was good home cooking.

Over time, my mom ended up making dumplings for special occasions like our birthdays and major holidays. Every Christmas morning, I remember waking up early and sitting in the kitchen with my brothers, folding dumplings, as we would race to see who can fold the most. Once everything was assembled, my mom would make fried dumplings, steamed dumplings and dumpling and rice cake soup. We were in dumpling heaven! Those are some happy food memories for me, so whenever Christmas comes around, I reminisce about those dumplings, and so I’ve put together my version of her recipe. Enjoy!

Korean Dumplings (Mandu)

Yield: About 3 dozen

Ingredients

7 ounces of organic soft tofu
1 cup of grated cabbage
1/3 cup of finely grated carrot
1/4 lb. of beef brisket, finely chopped (or extra-lean ground beef)
1/8 tsp. baking soda
1 1/2 teaspoon of sesame oil
1/4 cup of finely grated onion
1 green onion, finely chopped
1/2 teaspoon organic sugar
1 egg
1 teaspoon Kosher salt
1/2 teaspoon fresh grated pepper
1 packet of round wonton skins (36 wrappers)
Vegetable oil for frying
Dipping sauce (recipe below)
1. Place the tofu in a cloth napkin or cheese cloth. Wrap tightly to create a beggar’s purse. Squeeze out as much of the liquid as possible. Remove the tofu from the napkin and place in a bowl and set aside.

image

2. Placed the grated cabbage in a sieve and sprinkle with a pinch of salt. Place over a bowl and let sit for 5 minutes. Squeeze as much of the liquid out of the cabbage as possible. Place in a small bowl and set aside.

image.jpg

3. Place the grated carrot in a small sieve and sprinkle with a smidgen of salt. Place over a bowl and let set for 5 minutes. Squeeze as much of the liquid out as possible. Place in a small bowl and set aside.

image

4. In another bowl, combine the beef, sesame oil, and baking soda. Stir to combine and let it sit for 5 minutes.

5. In a large bowl, add the tofu, cabbage, carrots, beef, onion, green onion, sugar, egg, salt and pepper and stir to combine. You can also use a clean hand to mix all the ingredients.

image

image

6. Get your wonton skins and a small bowl of water. Take one of the wonton skins and place a heaping teaspoon of the dumpling mixture onto the skin. Dab some water around the edges and fold over to make a half-moon. Press tightly to seal (if you want to get fancy, you can create pleats). Place the dumpling on a parchment lined half sheet pan. Keep the rest of the wonton skins covered with a towel to prevent them from drying.

image

7. Repeat the process until all the filling is gone.

image

8. Heat a cast-iron skillet to medium. Once the skillet is hot, add 2 tablespoons of oil. Place about 1/3 of the dumplings in the pan. Cook on one side for about 3-5 minutes or until golden brown.

image

9. Flip the dumplings over and cook for another minute. Reduce the heat to low, add 1/4 cup of water and cover. Cook for about 5-10 until all the water has evaporated. (You are essentially steaming the dumplings to cook the filling.)

image

10. Remove the dumplings and transfer them to a plate. Serve with the dipping sauce.

 
Dipping sauce

1/8 cup organic soy sauce
1 teaspoon rice wine vinegar
1/2 teaspoon of coarse Korean red pepper powder
1/2 teaspoon sesame oil
1 small garlic clove, minced

Mix all the ingredients in a small bowl. Serve with the dumplings.

Ground Chicken with Thai Basil

I am a huge fan of anything spicy, but one of my favorite spicy cuisines is Thai food. I love the beautiful colors, layers of textures, and fragrant ingredients. Aromatic ingredients like curry, lemongrass, galangal, coconut milk, kaffir lime leaves, fish sauce all lead to a wonderful balance of flavors in their dishes. Every bite of Thai food is an explosion of salty, sweet, spicy, sour and umami flavors. It’s the kind of food I crave I want something bold and spicy!

I first learned how to cook Thai food from a Thai chef when I was in college. She was staying in Los Angeles on a temporary worker visa. I met her on a Mammoth ski trip, but instead of bringing ski clothes, she brought a large cooler full of Thai ingredients! There were sauces, spices, herbs, produce, protein, and homemade stock. She taught me how to make five different dishes that weekend, and everything she made was absolutely delicious. I was so excited during my cooking lessons, I didn’t even take notes! But amazingly all her instructions sank right into my brain and got stored in my long term memory (though I eventually transferred the recipes to paper).

Here is one of the five recipes she shared with me, which is known as Pad Kra Pao Kai in Thai restaurants. It is made with ground chicken and Thai basil and is easy to prepare, but it does require a few ingredients from the Asian market. Her recipe calls for 3-5 chilies, but only I added one in this recipe so my kids won’t burn their tongue. You if like it extra spicy you can add a couple more. Enjoy!

Ground Chicken with Thai Basil

Serving Size: 4

2 tablespoons of sunflower oil
2 heaping tablespoons of chopped garlic (about 5 cloves)
12 ounces of organic ground chicken
1 Thai Bird’s Eye Chili, thinly sliced crosswise (optional)
1/2 cup of red bell pepper, sliced in strips
1/2 cup of bamboo shoots, sliced in strips (fresh or canned)*
2 tablespoons of fish sauce (Three Crabs or Red Boat brand)
2-3 tablespoons of oyster sauce
1 tablespoon of soy sauce
1 teaspoon of organic sugar
1 teaspoon of sweet paprika
1/2 cup of chicken stock, cold
1 teaspoon of organic corn starch (Rapunzel brand)
1 1/2 cups of Thai basil leaves

image
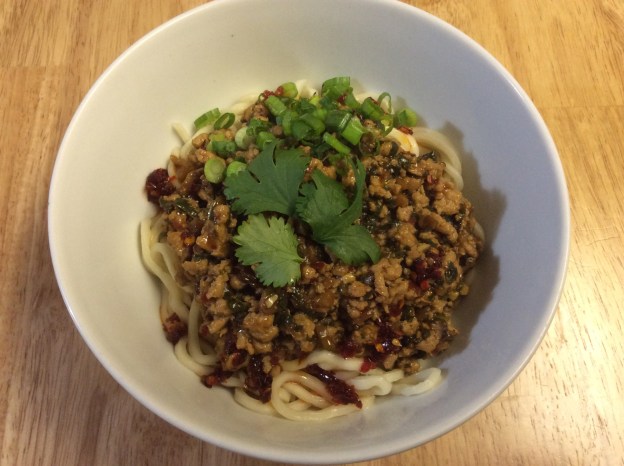
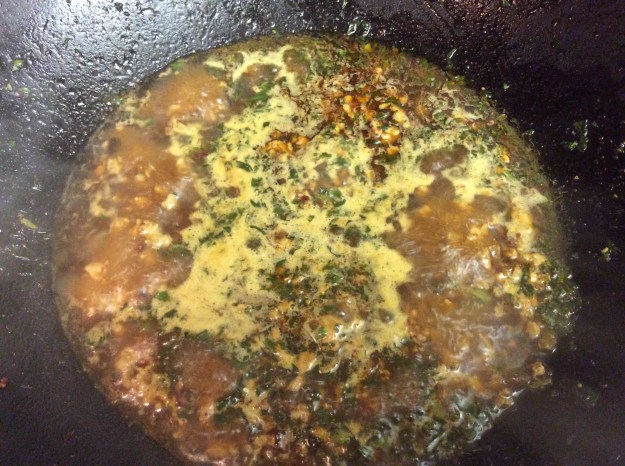
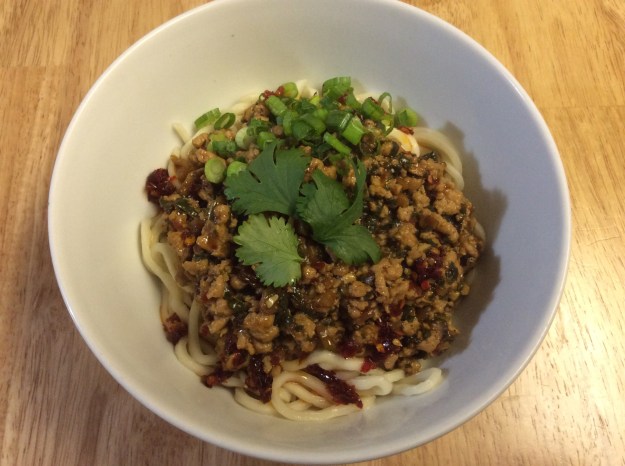
1. Heat a wok on high. Add 2 tablespoons of oil. Add the garlic, sauté for 10 seconds. Then add the ground chicken all at once. Cook for about three minutes.

image

2. Add the Thai chili (if using) and red bell peppers and cook for 1 more minute.

image

3. Add the bamboo shoots and stir fry for 1 more minute.

image

4. Add the fish sauce, 2 tablespoons of the oyster sauce, soy sauce, sugar and the sweet paprika. Stir to combine. Taste to see if you need the additional tablespoon of oyster sauce.

image

5. Add the cornstarch to the chicken stock and stir to create a slurry. Add the mixture to the chicken and stir to combine. Cook until the mixture begins to thicken.

6. Stir in the Thai basil.

image

7. Remove from heat. Serve with rice and one egg, sunny side up.

*Sometimes you can find the fresh bamboo shoots in the produce section. The canned version comes sliced in strips. If you’re using the one from the can, make sure you blanch the bamboo shoots. Boil in water for one minute then shock in ice water. Drain and set aside until ready to use.

Garlic Noodles with Sautéed Shrimp

The Famous Garlic Noodles recipe at Crustacean in Beverly Hills has been a heavily guarded secret for nearly 20 years. In fact, the dish is made every day behind closed doors, in a separate “secret” kitchen off the main kitchen. Many people, including famous celebrities, have requested access to the secret kitchen, but they all have been denied. Much like the secret formula for Coca-Cola or KFC’s original recipe of 11 herbs and spices, the recipe lives with a select few. In my opinion, the noodles are good, but the reason they’re “famous” is because of the intrigue surrounding the recipe, one which has become coveted by many. In fact, search the internet and you will find dozens of copycat versions of the dish, proving once again that imitation is the sincerest form of flattery. Today I am adding my version to the group of imitators, which I created years ago for a friend. It may not be exactly the same, but it’s pretty darn tasty. Enjoy!

Garlic Noodles with Sautéed Shrimp

Serving size: 4 with other side dishes

1 package of Hakubaku organic wheat ramen noodles (9.5 ounces) or 12 ounces of fresh chow mein noodles
½ stick of unsalted butter
5 large garlic, minced
1 ½ tablespoons of fish sauce (Three Crabs or Red Boat brand)
1 tablespoon of oyster sauce (or vegetarian oyster-flavored sauce)
½ tablespoon of Maggi or thick soy sauce
2 teaspoons of sugar
12 ounces of sautéed shrimp or 8 oz of sliced extra firm tofu
¼ cup of chopped scallions
Freshly grated black pepper
¼ cup grated Parmesan cheese
Chopped cilantro (optional)

1. Cook noodles in boiling water for 4 minutes (or 1 minute if using using fresh noodles).

image

2. Meanwhile, melt the butter in a saucepan over medium heat. Add the garlic and cook for 2 minutes. Add the next 4 ingredients and remove from heat. Set aside.

image

3. Once the noodles are cooked, drain but don’t rinse and reserve ¼ cup of the water. (If using fresh noodles, drain in cold water.)

4. Heat a large wok to medium heat. Add 3/4 of the garlic sauce. Add the noodles, scallions, cooked shrimp, and a few turns of the black pepper mill. Add a few drops of the reserved water to loosen noodles. Taste to see if you need the remainding garlic sauce.

image

5. Add the Parmesan cheese. Mix well.

6. Remove from heat. Divide noodles among 4 bowls and top with chopped cilantro. Serve immediately.


Sautéed Shrimp Recipe

12 ounces of large shrimp, cleaned and deveined
3 tablespoons of neutral oil (sunflower or vegetable)
1 teaspoon of white vinegar
1 tablespoon of minced garlic
½ teaspoon of paprika
½ teaspoon of salt

1. Mix all ingredients in a glass bowl and marinate in the refrigerator for 20 minutes.

2. Remove from the refrigerator.

3. Heat a large sauté pan over medium-high heat. Coat with oil. Add the entire shrimp mixture at once.

4. Sauté shrimp for roughly 5 minutes or until just cooked through. Remove from heat. Set aside until ready to use.