Category Archives: Pork

Juicy Beef Sliders

Living in Southern California, I have access to some of the most delicious burgers. Whether it’s the classic animal-style at In-N-Out, the original gourmet burger at Father’s office, or the Hatch burger at Umami – I love them all. What I can’t seem to find when dining out, though, are good beef sliders. Because sliders are smaller, there’s lots of room for error: overcooking the meat, using too many toppings, soggy buns, etc. When I think of the perfect little burger, the White Castle cheeseburger comes to mind. The buns are soft, there are lots of yummy bits of cooked onions, the cheese is melted perfectly, and the meat is tender. Thinking of White Castle has inspired me to make my own version of beef sliders at home.

I came up with this recipe while shopping at Trader Joe’s, where I purchased all the ingredients with the exception of the ground beef. I was fortunate enough to acquire some some grass-fed beef from a rancher in Bend, Oregon, but if I hadn’t, I would have bought some fresh ground beef from my local butcher or ground my own, either of which I recommend. Make sure the ground beef is 80% lean and 20% fat for extra tenderness. One of the biggest mistakes cooks make is shaping the meat into round patties by hand, which toughens the meat. You want the air pockets from the spaces and grooves that were formed when the butcher ground the beef, as this will also keep the meat tender. Also, though it’s not my favorite, American cheese is actually the best cheese for these burgers. It melts beautifully and gives the sliders that classic burger taste. I add sautéed onions, which not only adds moisture, but great taste, and sliced pickles are essential for adding acid and balance. Finally, add your favorite BBQ sauce. I love Trader Joe’s new Sriracha and Roasted Garlic BBQ Sauce for a little kick. This step-by-step method will ensure moist and delicious sliders. Enjoy!


Juicy Beef Sliders

Yield: 8 mini burgers


1/2 large sweet onion

Sunflower oil or vegetable oil

Kosher salt

6 slices of organic American cheese

8 slider rolls or mini buns

8 slices of sweet bread and butter pickles

Freshly ground pepper

1 lb of grass-fed ground beef, 80/20

Your favorite barbecue sauce (Trader Joe’s Sriracha BBQ Sauce)


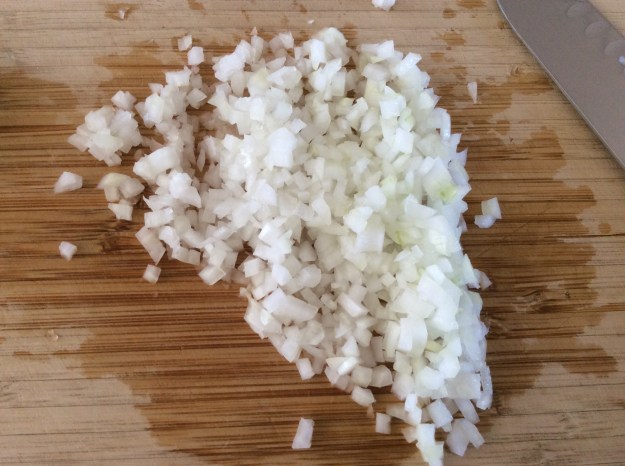
1. Chop the onions into a small dice. Heat a medium sauté pan to low heat. Add about 1 tablespoon of oil, then add the onions and 1/2 teaspoon of salt. Sauté, stirring occasionally for about 15-20 minutes.

IMG_5878IMG_5884

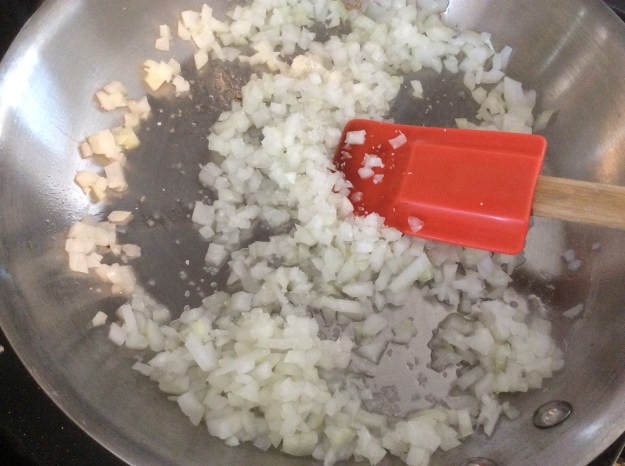
2. The onions should be tender and translucent, but not have a golden color. Set aside.

IMG_5894.JPG

3. Get all your toppings ready. Remove the cheese slices out of their individual plastic wrappers. You will need to cut out 1/3 of the cheese so it will be the correct slice for sliders. You will combine you smaller cheese scraps for 2 of the sliders. Place them on a parchment paper so they stick to each other.

IMG_5914

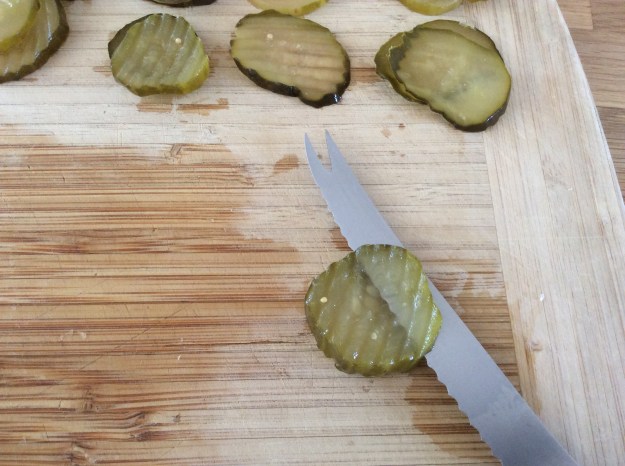
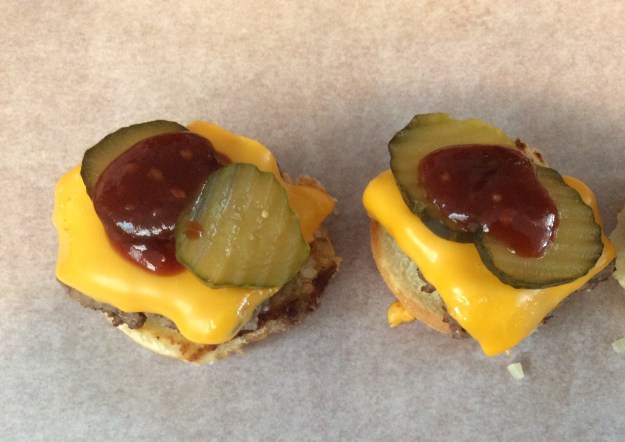
4. Take the pickle slices out of the jar. Slice each one at a diagonal. Bread and butter pickles tend to be a little thick. You’ll have 16 slices. It’s an extra step, but it makes a difference in the taste of each bite. Set aside.

IMG_5885

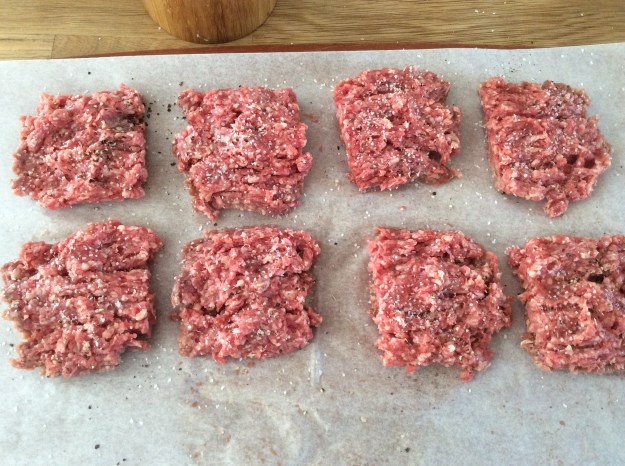
5. Take the ground beef and serrated knife and begin cutting the beef into 8 portions. Gently flatten each portion by separating the meat pieces with your fingers, but you do not need to form it into a traditional burger shape. If you handle the ground beef too much, it will toughen the meat.

IMG_5887IMG_5888IMG_5889

6. Season the meat with a sprinkle of salt and pepper.

IMG_5890

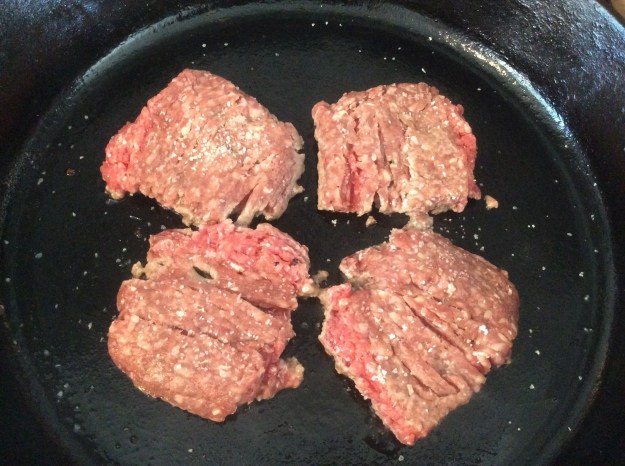
7. Heat a large cast-iron pan to medium-high heat. Take out the slider rolls and set aside. Place 4 ground beef portions, seasoned-side down, onto the cast-iron pan. Sprinkle salt and pepper on the unseasoned side. Cook the meat for about 2 minutes until you get a nice sear.

IMG_5891IMG_5892

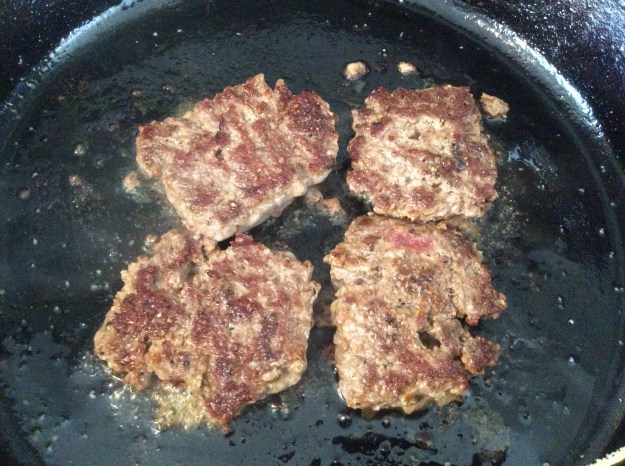
8. Flip the meat and add the cheese slices. Add the 4 slider buns to the pan, cut side down (total of 8 slices).

IMG_5893

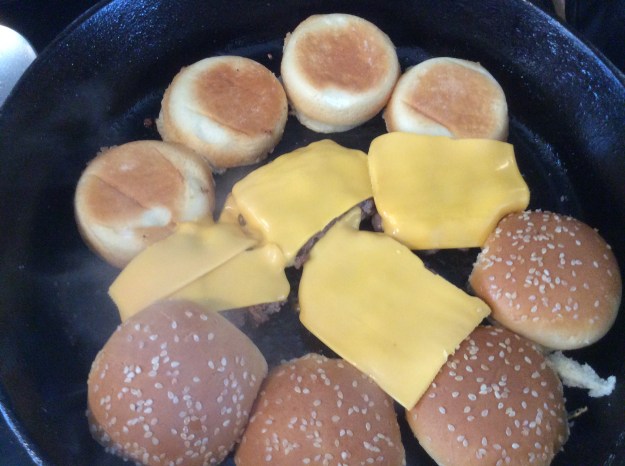
9 . Cook the meat for about one minute on the other side. I like my burgers medium.

10. To assemble the sliders, spread about a teaspoon of the cooked onions on the bottom bun.

IMG_5903

11. Add the cooked meat, two pickle slices, 1 tablespoon of your favorite BBQ sauce, then the top slider bun. Serve right away.

IMG_5904IMG_5907

IMG_5908

12. Repeat the process with the remaining beef and ingredients to make four more sliders. Enjoy!

IMG_5912

Trader Joe’s Pantry


Advertisement

Jajangmyeon

Growing up, we’d often order jajangmyeon at our local Korean-style Chinese restaurant. Jajangmyeon is a traditional Korean noodle dish that is a combination of pork and wheat noodles in a black bean sauce. It originated in China but made its way to South Korea with Mandarin Chinese immigrants, who adapted the dish for the Korean palette. The Korean version has more sauce and a richer flavor, and usually has less fat on the pork and in the sauce.

One of my fondest food memories was watching the chef hand-pull the noodles, transforming the dough into even strands of beautiful noodles by pulling, stretching and twisting it in the air. I was in awe whenever I watched the chef perform his magic, as the noodles danced and floated in front of him until they were the perfect thickness. He did this all for a single bowl of jajangmyeon. Today, most Korean-style Chinese restaurants serve jajangmyeon with factory-made noodles, so finding hand-pulled noodles is a real treat.

My version of jajangmyeon is a healthier version of the dish, as I use less oil and and leaner pork to try and cut down on the fat. I also pre-marinate the pork, which ensures tender pieces of meat. This sauce is rich and full of great flavor, and I love to eat a big bowl of these noodles with a side of cabbage kimchee or takuan. Enjoy!

Jajangmyeon

Serving Size: 4

Sunflower oil or organic canola oil

1 large sweet onion, chopped into 1/2″ in pieces

1/2 large zucchini, cut into 1/2″ pieces (3/4 cup)*

1 small Yukon gold potato, 1/2 ” dice (3/4 cup) – parboiled for 5 minutes

8 ounces of par-cooked, marinated pork (recipe below)

2/3 cup of fermented black bean paste**

2 teaspoons of organic sugar

1 tablespoon of organic soy sauce

1 1/2 cups of water

2 tablespoons of organic cornstarch

22 ounces of fresh jajangmyeon noodles or Chinese wheat noodles (medium thickness)**

1/2 cup of julienned cucumbers (seeds omitted)


1. Heat a wok to medium-high heat. Add 1 tablespoon of oil. Once the oil starts to smoke, add all the chopped onion. Sauté for about 3 minutes until the onion becomes translucent.

img_5510
2. Meanwhile, bring a large pot of water to boil.
3. Add the cut zucchini pieces to the wok with the onions. Sauté for 2 more minutes.

IMG_5513.JPG

4. Add the par-cooked pork and potatoes to the wok.

img_5514

5. Add the black bean paste. Stir to incorporate.

img_5515

6. Add the soy sauce, sugar and water and bring it to a boil.

img_5517

7. Meanwhile, add the noodles into the boiling water. Follow the instructions on the package. Rinse and set aside. (You want to time the noodles so they will be ready when the sauce is done)

img_5522img_5525

8. Mix the cornstarch with 2 tablespoons of water to create a slurry. Stir into the sauce.

img_5519


9. Cook and stir until thickened.

img_5524

10. Divide the noodles evenly into four bowls. Ladle a generous amount of sauce into each of the bowls. Top with some julienned cucumbers and serve with cabbage kimchi.

img_5542img_5531

* When cutting the zucchini, remove the center seedy potion.  The section with the seeds becomes mushy when cooked. Then dice the  zucchini to 1/2″ pieces as shown.

img_5507img_5508

**  Fermented black bean paste and jajangmyeon noodles can be found at your local Korean supermarket.

img_5511img_5504


Marinated pork recipe 

8 ounces of lean pork chuck or tenderloin

1/4 teaspoon of baking soda

1 teaspoon of organic cornstarch

1 teaspoon of organic soy sauce

1 teaspoon of Shoxing wine or Sake


1. Dice the pork into small pieces just shy of 1/2″

img_5496
2. Place the cut pork in a small bowl and sprinkle with baking soda. Mix well and let it sit for 10 minutes (I would suggest using a timer for this step because you do not want exceeded the time allotted or the pork will be too tender.)

img_5497
3. After the 10 minutes, add the cornstarch, soy sauce and the wine. Stir and let sit for 2 minutes.

img_5498
4.Meanwhile heat a wok to high. Add 1 tablespoon of oil. Once oil gets hot, add the marinated pork. Leave undisturbed for 30 seconds.

img_5500
5. Using a wooden spoon stir and sauté for about one minute.
Place in a bowl and set aside until ready to use.

img_5503

Pork and Potato Hand Pies

When I think of hand pies, my mind always goes to ones with a sweet filling – the apple pies at McDonald’s, the Hostess cherry pies, even Pop-Tarts – but every so often I crave a good savory meat pie. Many cultures have their own version of this dish: baked pierogis from Poland, salteñas from Bolivia, pasties from the UK, or pâté chaud from Vietnam, to name a few. I tend to make mine in the style of Argentenian empanadas, and my meat of choice when it comes to savory pies is almost always pork.

My hand pie recipe is made with a traditional pie crust, braised pork and potato filling. The pork is slowly braised in beer and chicken stock with lots of fragrant spices. This produces a tender and moist filling full of flavor. The addition of potato to the filling helps absorb some of the juice from the pork during the baking process. The creamy potatoes also add a layer of richness to the pies. If you are pressed for time, I encourage you to use store-bought pie dough as it produces good results as well. This hand pie recipe is perfect to make with family members and friends during the holidays or for your next potluck. Enjoy and Happy Holidays!


Pork and Potato Hand Pies

Yield: About 4 dozen


Flaky pie dough (recipe below) or 2 packages of pre-made refrigerated pie dough

1 recipe of beer-braised pork shoulder, shredded and cut into smaller pieces (recipe below, make 1 day in advance)

1 recipe for chopped potatoes with cream (recipe below)

1 large egg

2 tablespoons of cream

Pinch of sea salt


1. Line 3 large baking sheets with parchment paper. Set aside.

2. Lightly dust a work station. Roll out the pie dough to 1/8″ thickness. Cut the dough into circles using a 3 1/2″ circular cookie cutter. Cover with plastic wrap to prevent the cut dough from drying out.

3. Whisk together the egg, cream and a pinch of salt. Set aside.

img_5182

4. Create an assembly line of the braised pork, potatoes, and egg wash.

img_5180

5. Place about 1 heaping tablespoon of pork and 1 heaping teaspoon of potatoes in the center of the pre-cut dough.

img_5183img_5184

6. Brush half of the edges with egg wash. Fold and press to seal. Repeat the process until you have 1 tray ready, which will be about 12-16 hand pies.

7. Preheat the oven to 350°.

8. Using the tines of a fork, pierce once in the center of each assembled pie.

img_5186

9. Brush with egg wash.

img_5188img_5171

10. Bake in the oven for approximately 20-25 minute until they are a nice golden brown.

img_5173

11. Cool on a rack for 10 minutes. Serve warm or at room temperature.

img_5191img_5195
Braised Pork Shoulder Filling

3 lbs. of pork shoulder

Olive oil or other vegetable oil

1 tablespoon of Kosher salt

1 teaspoon of brown sugar

1 teaspoon of sweet paprika

1 teaspoon of ground coriander

1 teaspoon of ground cumin

1/2 teaspoon of ground cardamom

1/2 teaspoon of freshly ground pepper

2 sweet yellow onions, 1/2″ slices

5 cloves of garlic

2 fresh or dried bay leaves

1 bottle of light beer (like a Stella Artois or Corona)

2 cups or more of chicken stock

1/2 packet of gelatin

1. In a small bowl, combine the salt, paprika, coriander, cumin, cardamom, and black pepper. Rub mixture on the pork, then let sit at room temperature for 30 minutes.

img_1189

2. Preheat the oven to 450°.

3. Toss the onion and garlic cloves in olive oil and place on a baking sheet. Roast for 20-25 minutes and remove from the oven. You want them slightly charred.


4. Reduce the heat of the oven to 300°.

5. Meanwhile, heat a Dutch oven to high heat over a stovetop. Add about 1 tablespoon of oil. Get a good sear on the pork on all sides.

img_1190

6. Add the roasted onions and garlic to the pot, along with 2 bay leaves. Pour the beer over the pork and onion mixture. Top off with chicken stock to cover the pork. Cover with lid.

img_1191img_1192

7. Braise in the oven for approximately 5-6 hours. Check progress at the 4 hour mark. The filling is done when the meat falls apart.

8. Remove the bay leaves and discard. Remove the pork and set aside. Strain the broth through a chinois, pushing down the solids with a wooden spoon to extract as much of the liquid as possible. Place the pork back into the pot and refrigerate overnight.

9. The next day, remove the harden fat layer on top of the broth with a spoon and discard. Remove the pork and shred and cut any long pieces with kitchen shears. Set aside.

10. Place the broth pot back on the stove and boil over high heat until it is reduced by half. Stir the gelatin into 2 tablespoons of cold water and then stir into the broth. Place the pork back into the pot. Taste for seasoning and add salt and pepper as needed.

11. Cool at room temperature for 30 minutes and then refrigerate until completely cooled before using.


Potatoes and Cream Filling

3 cups of Yukon gold potatoes, chopped into 1/4″ dice (about 2 small potatoes)

Kosher salt

3 tablespoons of heavy cream

Freshly ground pepper to taste

1. Put 1 1/2 quarts of water in a medium pot. Bring to boil.

2. Add Kosher salt until it tastes like the ocean, about a small handful.

3. Add the chopped potatoes and boil for approximately 5 minutes. Drain and transfer to a medium bowl.

4. Stir in cream and taste and add salt if needed. Add a couple turns of the pepper mill. Stir again and cover with plastic wrap and refrigerate until ready to use.

img_5178


Pie Crust

4 cups of unbleached all-purpose flour

1/4 cup of sugar

1 1/2 teaspoon of Kosher salt

1 pound of cold unsalted butter, cut into cubes

2/3 – 3/4 cup of cold ice water


1. Add the flour, sugar, and salt in the food processor. Pulse a few times.


2. Add the butter pieces. Pulse a few more times until the butter pieces are incorporated, but still visible.

image

3. Slowly add the cold water while pulsing.

image

4. Stop once the dough comes together.

5. Transfer to a lightly-dusted workstation. Knead until the flour comes tougher.

image

6. Divide the dough into 2 equal parts and roll the dough into disks.

7. Double wrap in plastic and place in the refrigerator for up to 2 days.

Agnolotti dal Plin

In April of 2003, Los Angeles Times featured an article in their Food section about Il Ristorante di Guido da Costigliole, a restaurant in the Piedmont region of Italy. The article focused on a regional, filled pasta called agnolotti dal plin. Lidia Alciati, the owner and chef of the restaurant, cranked out thousands of agnolotti every week for 40 years. I was was intrigued and I saved the article for my honeymoon trip to Italy that June.

When my husband and I arrived in Asti, we learned that Lidia had retired and that her sons had taken over the family business and found their restaurant a new home. We were directed to a beautiful 5-star hotel in a restored 1619 monastery, atop a hill overlooking a picturesque valley of vineyards. The restaurant was located under the hotel in a converted wine cellar. Once we were seated at our table, I was overcome with excitement. When the agnolotti arrived, the little, yellow pillows of pasta were glistening in light butter sauce. When I took a bite, I thought I had died and gone to heaven. The delicious pasta packets were filled with rabbit, pork, veal, spinach, Parmesan cheese and hint of nutmeg.

Today I bring you my version of Guido’s agnolotti. Instead of adding rabbit and veal, I used all pork for my recipe, and I also replaced the spinach with Swiss chard. Make sure you roast the pork a day in advance. For the pasta, I really like Thomas Keller’s pasta recipe for the agnolotti. It’s easy to work with and the perfect texture for this dish. You can also make the pasta a day ahead if you prefer. Making this dish requires a lot time, but it’s worth the effort. This recipe makes enough to feed an army so it’s perfect for the holidays or any other special occasion. Enjoy!

Agnolotti dal Plin

Serving size: 12

Olive oil
1 garlic clove, finely chopped
2 teaspoons of finely chopped rosemary
2 pounds of roasted pork shoulder (recipe below)
3 cups of Swiss chard, chopped
1 cup freshly grated Parmigiano-Reggiano
1/2 teaspoon of nutmeg
Salt
Freshly grated pepper
2 large eggs
28 ounces of fresh pasta dough – Thomas Keller’s Pasta Recipe
1/2 cup of unsalted butter
1/2 cup of reduced pork or veal stock
6 sage leaves
Parmigiano-Reggiano for serving

 
1. Take the pasta out of the refrigerator and bring to room temperature.

2. While waiting for the pasta to come to room temperature, take the roasted pork out of the refrigerator and remove most of the fat using a knife. Cut into large chunks and then pulse a few times in the food processor until it resembles ground beef. Transfer to a large bowl.

3. Remove the reserved pork drippings from the refrigerator. Scrape off the fat cap and you should be left with a gelatinous pork stock. Set aside.

4. Heat a large sauté pan over medium heat. Add 1 tablespoon of olive oil and sauté the Swiss chard for about five minutes. Add a 1/4 cup of water and cover with a lid until most of the water is absorbed. Transfer to a food processor and process until smooth. You may need to add a little water. Set aside.

5. Heat the same sauté pan over medium-high heat. Add 1 tablespoon of olive oil and add the garlic and rosemary. Sauté for one minute. Add the ground pork meat and cook for about 5 minutes. Season with salt and pepper to taste. Transfer back to the large bowl and cool at room temperature.

image

6. Once the meat has cooled, stir in the Parmigiano, 2 eggs (slightly beaten), Swiss chard, reserved pork stock, nutmeg, and salt and pepper to taste. This is the agnolotti filling. Cover with plastic wrap, and place in the refrigerator while you roll out the pasta.

image

7. Roll out the pasta dough a few sheets at a time and keep any unused portion of pasta tightly wrapped in plastic. On your pasta roller, roll the pasta sheet to the second thinnest setting.

image

8. Remove the filling from the refrigerator. Using a small teaspoon, place a portion of filling about 1 inch from the bottom of the sheet. Continue placing portions of filling across the bottom of the sheet, leaving 1 inch space in between each.

image
9. Fold the bottom of the pasta sheet to partially cover the filling.

image
10. Fold from the bottom again, rolling the pasta while pinching between each pocket of filling. It is important to leave this “pinched” area between the agnolotti, or when the agnolotti are separated, they may come unsealed.

image
11. Run a crimped pastry wheel away from you and between the center of each pinched area to create the individual agnolotti. Place the filled agnolotti on a parchment-lined baking sheet. Place the baking sheet with the agnolotti inside the freezer until frozen.

image
12. Repeat the process until all the agnolotti is filled.

image.jpg

13. Fill a large pot of water halfway and add a generous amount of Kosher salt. Bring to a boil.
14. Meanwhile, in a large sauté pan over medium heat, add half the butter until melted. Add three sage leaves, sauté for one minute. Add 1/4 cup of the reduced pork or veal stock. Lower the heat to warm.
15. Once the water is boiling, add about 1/4 of the agnolotti. Once the pasta rises to the top cook for about one more minute. With a large slotted spoon, transfer to the sauté pan with butter sauce.

16. Bring the water back to a boil and add another 1/4 of the agnolotti. Once cooked, transfer to the same pan. Toss to coat. Transfer to a large serving platter.  Repeat the process with the remaining agnolotti or you can also freeze the rest in a plastic bag for up to 1 month.

17. To serve, place about 8 to 10 pieces of agnolotti on a plate. Grate a generous amount of Parmesan cheese, a couple turns of a pepper mill, and sprinkle with a little sea salt. Served with a nice glass an Italian red wine.

image.jpg


Roasted Pork Shoulder

1/2 teaspoon of paprika
1/2 teaspoon of brown sugar
1/4 teaspoon cumin
1/4 teaspoon chili powder
1 teaspoon of salt
1/2 teaspoon of pepper
2 1/2 lbs. of pork shoulder
Leaves from 1 sprig of rosemary
2 cloves of garlic, smashed
1 onion, roughly chopped
2 carrots, roughly chopped
2 celery ribs, roughly chopped
1 bay leaf

1. Mix the first 6 ingredients in a small bowl and rub all over the pork. Then rub the pork with the smashed garlic and rosemary leaves. Let the pork rest for 30 minutes at room temperature.

image

2. Heat oven to 450°.

3. In a small roasting pan, add the pork. Scatter the onions, carrots, celery, and the bay leaves in the pan. Roast for 30 minutes.

image

4. After 30 minutes, turn the heat down to 325°. Remove the pork out of the oven and cover tightly with aluminum foil. Put the pork back in the oven and roast for about 1 hour and 15 minutes.

5. Cool to room temperature. Transfer the meat drippings into a container with a lid. Cover the pork with foil. Place both the pork and the drippings in the refrigerator until ready to use